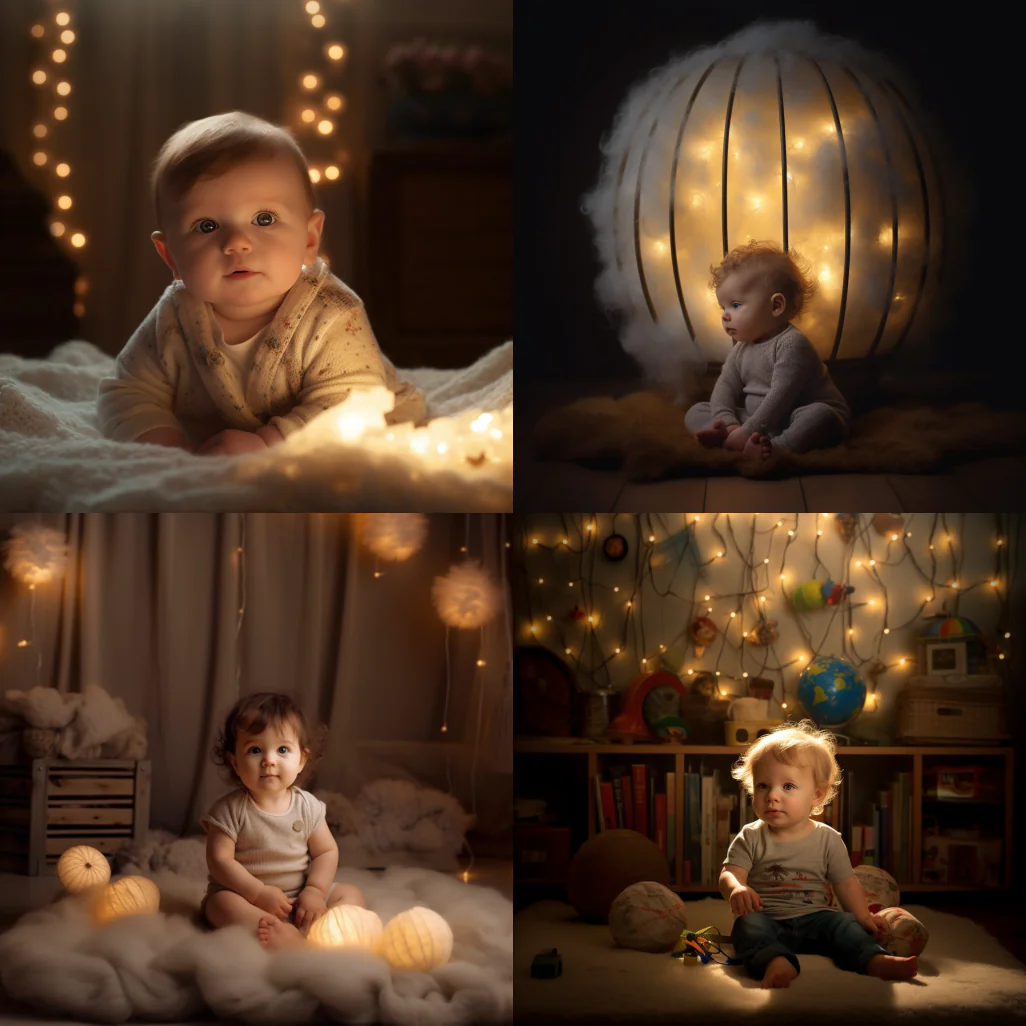
Shedding Light: Best Lighting for In-home Newborn Photography!
Lighting is one of the most important aspects of in-home newborn photography, as it can greatly affect your photos‘ mood, tone, and quality. Choosing the right lighting can help you create beautiful and timeless images that capture the essence of your newborn.
This guide will shed some light on the best lighting for in-home newborn photography. We’ll cover everything from natural light to artificial light sources, as well as some tips and techniques for creating the perfect lighting setup for your photoshoot.
How to choose the best lighting for in-home newborn photography?
Capturing precious memories of your newborn is an exciting and important task. Choosing the right lighting is key to taking stunning in-home newborn photos. Follow these tips to illuminate your baby’s delicate features and create breathtaking images you’ll cherish forever.
Opt for Natural Light
- Prioritize using natural light from windows or doors, which provides a soft and even illumination that flatters your newborn’s skin.
- Avoid direct sunlight to prevent harsh shadows and uncomfortable glare.
- Schedule the photo session early or late afternoon for the best light quality.
Utilize Soft, Diffused Light
- Soften artificial light sources with diffusers, umbrellas, or softboxes to reduce harsh shadows and create a gentle, even glow.
- Position your light source at a 45-degree angle from your baby to enhance its features and avoid flat, uninteresting lighting.
Try Reflectors and Bounce Cards
- Reflectors and bounce cards help direct natural or artificial light toward your baby, filling in shadows and enhancing overall image quality.
- Experiment with different reflector colors (silver, gold, or white) to create your images’ desired warmth and tone.
Consider Continuous LED Lights
- Choose continuous LED lights for adjustable color temperature, intensity, and minimal heat output, ensuring your newborn stays comfortable throughout the session.
- Opt for battery-powered LED lights to avoid cords and increase flexibility in positioning.
Test Multiple Light Setups
- Experiment with different light setups, such as one main light and a fill light or adding a backlight for a more creative look.
- Take test shots to determine the best light arrangement for your specific setting and baby’s features.
Where should lighting be placed for newborn photography?
Strategic lighting placement is crucial for capturing professional-quality newborn photos. Here are some guidelines to help you position your lights effectively for breathtaking images:
- 45-Degree Angle: Position your main light source at a 45-degree angle to your baby. This helps create depth and dimension in the photo by casting soft shadows on the opposite side of the light head. Ensure the light is slightly above the baby’s eye level to prevent unflattering shadows.
- Fill Light: Place a fill light or use a reflector on the opposite side of the main light source. This helps soften shadows and achieve even illumination across your baby’s features. Adjust the intensity of the fill light or the distance of the reflector to control the contrast in your image.
- Backlight or Rim Light: To create a more artistic look, consider adding a backlight or rim light behind your baby, aimed towards their back or the side of their head. This will create a halo effect, separating the baby from the background and providing a three-dimensional appearance.
- Window Light: If you’re using natural light from a window, place your baby at a 45-degree angle to the window, with the light source slightly above their eye level. You can use a reflector or bounce card to fill in shadows on the opposite side if necessary.
- Diffused Light: Regardless of the light source, it’s essential to diffuse the light for newborn photography. Use softboxes, umbrellas, or even sheer curtains to create a soft, even glow that flatters your baby’s delicate features.
Remember to experiment with different lighting setups and take test shots to find the ideal placement for your specific setting and your baby’s features. You’ll achieve the perfect lighting for your newborn photography with patience and practice.
How do you set up lighting for newborn photography?
| Aspect | Considerations |
|---|---|
| Light source | Use natural light from a window or light modifier, or artificial light that is soft and diffused |
| Light position | Position the light source at a 45-degree angle to the subject to create soft shadows and depth |
| Additional light | Use a reflector or bounce card to fill in shadows on the subject’s face |
| Light color | Use neutral or warm white light to avoid color casts or unnatural skin tones |
| Light intensity | Use low to moderate light intensity to avoid harsh shadows or overexposure |
| Test your setup | Test your lighting setup before the photoshoot to ensure it meets your desired aesthetic |
| Safety and comfort | Consider the newborn’s safety and comfort throughout the photoshoot and avoid any lighting setups that could harm the baby or cause discomfort |
What light is good for baby eyes?
- Natural light: Soft, diffused natural light from a window can be soothing for babies. North-facing windows are ideal because they provide indirect light that is not too bright or harsh.
- LED lights are energy-efficient and produce less heat than traditional incandescent bulbs. They are also available in various color temperatures, including warm, soft tones that can create a relaxing atmosphere for babies.
- Night lights: Soft, low-level night lights can provide a comforting glow for babies during nighttime feedings or diaper changes. Look for night lights that emit a warm, soft light that won’t disturb the baby’s sleep.
- Salt lamps: Himalayan salt lamps are popular for their calming and soothing effect. They emit a warm, soft glow that can create a relaxing atmosphere for babies.
Is flash or continuous lighting better for newborn photography?
Both flash and continuous lighting have their advantages and disadvantages in newborn photography.
Flash lighting is a quick burst of light that can freeze motion and capture sharp images. It can also provide a more dramatic effect to the photographs. However, the sudden burst of light can startle or disturb the newborn, which may result in an unhappy or unsettled baby. Additionally, the bright light can cause red-eye or harsh shadows, which may not be desirable in newborn photography.
On the other hand, continuous lighting provides a constant source of light that allows the photographer to see the light and shadows in real-time, making it easier to adjust the lighting to achieve the desired effect.
Continuous lighting is also more gentle and soothing for the newborn, as they are not startled by sudden light flashes. However, the constant heat from the lights can make the newborn uncomfortable, and the lighting can be less powerful than flash, which may result in longer exposure times and an increased risk of motion blur.
What time of day is best for indoor newborn photos?
The best time of day for indoor newborn photos depends on the available natural light and the photographer’s preferences. Generally, it is best to schedule the photo session during the time of day when the natural light is soft and diffused. This is typically in the morning or late afternoon when the sun is lower in the sky and the sunlight is less harsh.
The light is usually cooler and blue in the morning, creating a calm and soothing atmosphere for newborn photos. The light is generally warmer and golden in the late afternoon, creating a cozy and intimate atmosphere.
Choosing a room in the house with large windows that allow plenty of natural light to enter is important. North-facing windows can provide soft, diffused light, ideal for newborn photos. East-facing windows can offer a soft light in the morning while west-facing windows can give a faint light in the afternoon.
If natural light is not available or is not sufficient, artificial lighting can be used. Softbox lights or diffused light sources can mimic natural light and create a soft, diffused light that is flattering for newborn photos.
Why do babies’ eyes turn red in pictures?
Babies’ eyes can turn red in pictures because of the “red-eye effect.” The red-eye effect occurs when the light from the camera flash reflects off the retina at the back of the eye and back out through the pupil, which appears red in the photograph. This is more common in newborns because their eyes are still developing, and their irises’ pigment may not yet be fully formed.
The red-eye effect can be exacerbated if the room is dark and the pupils are dilated, allowing more light to enter the eyes. Additionally, some camera flashes can be more prone to causing red-eye than others.
To avoid the red-eye effect in newborn photography, photographers can use techniques to reduce the amount of light entering the eyes or eliminate the need for a flash. For example, photographers can use natural light or use softbox lighting that doesn’t cause as much reflection in the eyes.
They can also use a camera setting or a photo editing tool to remove the red-eye effect from the final photographs.
What angle of light should a newborn take photos of?
The angle of light for newborn photography can depend on the desired effect and style of the photos, as well as the available lighting in the room. Generally, a soft, diffused light source from the side or above the newborn is ideal for creating a gentle and flattering look.
When photographing newborns, it’s important to avoid harsh lighting from directly overhead or from below the baby’s face. This can create unflattering shadows and make the baby look less appealing in the photo. A light source from the side or above can help create soft shades that add depth and dimension to the image while keeping the baby’s face well-lit and flattering.
When using natural light, it’s important to position the newborn near a large window that provides soft, diffused light. This can help create a natural and flattering look for the baby. If using artificial lighting, photographers can use softbox lights or diffused light sources to mimic natural light and create a soft, positive light for the newborn.


One Comment